Introduction
Leather jewelry pouches are not only practical but also add a touch of elegance to your jewelry storage. Whether you’re looking to protect your precious items or give a personalized gift, making your own leather jewelry pouch can be a rewarding project. Plus, creating your own pouch allows you to choose the exact style, size, and features that suit your needs. In this guide, we’ll walk you through the process step by step, so you can craft a beautiful, durable leather pouch for your jewelry.
Materials and Tools Needed
Before diving into the crafting process, it’s essential to gather all the necessary materials and tools.
Selecting the Right Leather
The quality and type of leather you choose will significantly affect the final look and durability of your jewelry pouch.
Types of Leather (Full-Grain, Top-Grain, Genuine)
- Full-Grain Leather: This is the highest quality leather, known for its durability and natural texture. It’s an excellent choice if you want a premium finish.
- Top-Grain Leather: Slightly more affordable than full-grain, top-grain leather is also durable but has a more uniform appearance.
- Genuine Leather: A budget-friendly option, genuine leather is still durable but less luxurious compared to full or top-grain leather.
Leather Thickness and Quality
When selecting leather, aim for a thickness between 1.5mm to 2.5mm. This range provides a good balance between durability and ease of working with the material. Thinner leather is easier to manipulate, but thicker leather offers more protection.
Essential Tools
To make your leather jewelry pouch, you’ll need a few key tools.
Cutting Tools (Rotary Cutter, Scissors)
A sharp rotary cutter or a pair of heavy-duty scissors is necessary for cutting through leather smoothly and accurately.
Hole Punches and Stitching Awls
These tools are essential for creating holes for stitching and drawstrings. A stitching awl helps you sew through thick leather with ease.
Thread and Needles
Choose a strong, waxed thread designed for leatherwork, paired with sturdy needles that can penetrate leather without bending.
Additional Supplies
Besides the primary materials and tools, you’ll need a few more items to complete your project.
Drawstring Material
You can use leather cord, waxed cotton, or any durable string for the drawstring. The choice depends on the style you want to achieve.
Ruler and Cutting Mat
A ruler ensures your cuts are straight and precise, while a cutting mat protects your work surface.
Leather Conditioner
Leather conditioner keeps your pouch soft and supple, extending its lifespan and enhancing its appearance.
Step-by-Step Guide to Making a Leather Jewelry Pouch
With your materials and tools ready, let’s start crafting your leather jewelry pouch.
Step 1 – Preparing Your Workspace
A clean and organized workspace is crucial for a successful project.
Setting Up a Clean and Organized Area
Ensure your work area is free from dust and debris, which could scratch the leather. Lay out your tools within easy reach to streamline the process.
Safety Precautions When Working with Leather
When cutting and punching holes in leather, be mindful of your fingers and hands. Use a cutting mat to prevent damage to your work surface and always cut away from your body.
Step 2 – Measuring and Cutting the Leather
Accurate measurements are key to a well-fitting pouch.
Choosing the Pouch Size
Decide on the size of your pouch based on the jewelry you plan to store. A common size for a small pouch is around 6×8 inches, but you can adjust this to your needs.
Marking and Cutting the Leather
Use your ruler to measure and mark the leather according to your chosen dimensions. Cut the leather carefully with your rotary cutter or scissors, ensuring clean, straight edges.
Step 3 – Punching Holes for the Drawstring
The drawstring allows you to securely close your pouch.
Determining Hole Placement
Mark holes along the top edge of your leather piece, about 1/2 inch from the edge and spaced evenly apart. Typically, you’ll need around 6-8 holes, depending on the size of the pouch.
Using a Hole Punch Tool
Use a hole punch tool to create clean holes in the leather. Ensure the holes are large enough for your chosen drawstring to pass through easily.
Step 4 – Stitching the Pouch Edges
Stitching the sides of the pouch gives it structure and durability.
Saddle Stitch Method
The saddle stitch is a popular technique for leatherwork. It involves using two needles and threads to create a strong, durable seam. Start by threading your needle and passing it through the first hole, pulling the thread through until the lengths are even on both sides. Then, use a needle on each side to pass through the holes in a crisscross pattern.
Alternatives to Stitching (e.g., Glue)
If you prefer not to sew, you can use leather glue to bond the edges. However, stitching provides a stronger and more durable finish.
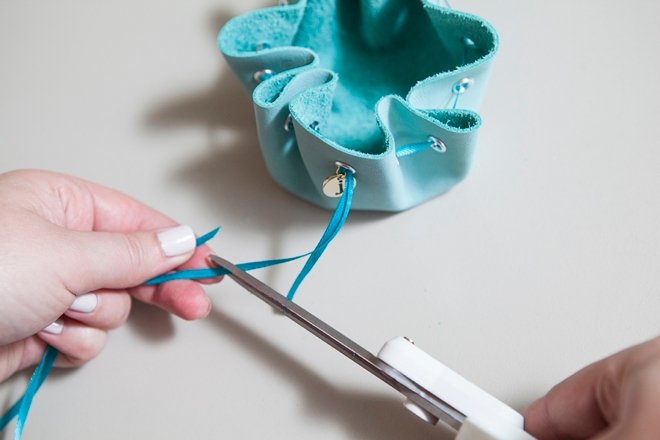
Step 5 – Adding the Drawstring
The drawstring completes the pouch, allowing it to be opened and closed easily.
Selecting the Right Drawstring Material
Choose a drawstring that complements your leather. Leather cord or waxed cotton are both excellent choices.
Threading the Drawstring Through the Holes
Thread the drawstring through the holes, starting from one side and weaving it through to the other. Once threaded, knot the ends to prevent them from slipping back through the holes.
Step 6 – Finishing Touches
Adding the final touches will enhance the look and longevity of your pouch.
Conditioning the Leather
Apply a leather conditioner to keep the leather soft and supple. This also adds a nice sheen to the finished pouch.
Adding Personalization (Initials, Designs)
For a personal touch, consider embossing initials or a simple design onto the leather. You can use a leather stamp or a metal embossing tool to create custom details.
Customization Ideas for Your Leather Jewelry Pouch
Once you’ve mastered the basics, you can get creative with your leather jewelry pouch.
Embossing and Stamping
Personalizing your pouch with embossing or stamping adds a unique touch.
Tools for Embossing
Embossing tools or stamps are widely available and can be used to press designs into the leather.
How to Create Custom Designs
Sketch your design first, then carefully use the embossing tool to press it into the leather. Practice on a scrap piece of leather to perfect your technique.
Adding Decorative Elements
Decorative touches can elevate the look of your pouch.
Beads, Charms, and Tassels
Add beads, charms, or tassels to the drawstring for a more decorative finish. These can reflect your personal style or the occasion for which the pouch is made.
Using Leather Dye for Color Variations
If you want to add color to your pouch, consider using leather dye. You can create patterns or simply change the color of the entire pouch to match your preferences.
Creating Unique Shapes and Sizes
Experimenting with different shapes and sizes can make your pouch stand out.
Designing Custom Patterns
Don’t be afraid to try non-traditional shapes or sizes. You could create a circular pouch or one with a flap closure for added security.
Experimenting with Different Leather Types
Try using different types of leather to see how each one affects the look and feel of the pouch. Suede, for example, offers a soft, velvety texture, while pebble-grain leather provides a more rugged appearance.
Tips for Maintaining Your Leather Jewelry Pouch
Proper care will ensure your leather pouch lasts for years.
Cleaning Your Leather Pouch
Regular cleaning keeps your pouch looking its best.
Regular Cleaning Routine
Wipe the pouch with a dry or slightly damp cloth to remove dust and dirt. For more stubborn stains, use a leather cleaner specifically designed for the type of leather you’re working with.
Products to Avoid
Avoid using water, soap, or harsh chemicals, as these can damage the leather. Stick to products specifically formulated for leather care.
Storing Your Leather Pouch
Proper storage is key to maintaining the pouch’s shape and condition.
Keeping the Leather Soft and Supple
Store the pouch in a cool, dry place away from direct sunlight. If the leather feels dry, apply a conditioner to maintain its softness.
Handling Wear and Tear
Leather can develop a beautiful patina over time, but it’s important to address any damage promptly.
Repairing Scratches and Scuffs
Minor scratches can often be buffed out with a soft cloth and a bit of leather conditioner. For deeper scuffs, you might need a leather repair kit.
Reconditioning Leather Over Time
As leather ages, it may require reconditioning. Applying a leather balm can restore its sheen and suppleness, keeping it looking good as new.
Conclusion
Making your own leather jewelry pouch is a satisfying project that results in a functional and stylish accessory. By following these steps, you’ll create a durable pouch tailored to your personal taste. Whether you keep it simple or go all out with customization, a handmade leather pouch is a beautiful way to store and protect your jewelry.